
Ask any professional gardener and they’ll tell you that your choice of hardscaping could literally make or break your yard’s design. When you really think about it, hardscaping aspects like paving might just be the single most important decision you can make when working on your garden.
Sure, you may occasionally smell the flowers, swing open your garden gate and even relax on custom garden furniture – but your feet will always be in contact with the ground.
So unlike furniture that is occasionally used and plants that bloom and go dormant seasonally, paved surfaces contribute in equal measure all year round. Paving slabs take the work and mess out of paving your garden by giving you a practical and convenient way to do it.
In addition to being easier to lay, these pavers come in eye catching designs and colours that can be used to make aesthetic patios and courtyards, pool decks, gazebo floors, driveways, crosswalks and even paths. So, how do you go about finding the best paving slabs for the job?
Key Features and Considerations When Buying Paving Slabs
a) Type and Material
Paving slabs basically come in two major types; natural and manufactured/composite. Natural slabs come from quarried stones like sandstone and granite which are dug and shaped by cutting, splitting and crushing. Composite slabs like concrete and brick pavers are moulded when soft and later dried. Natural pavers are generally more pricey, but also tougher, harder and stronger while manufactured pavers come cheaper and offer greater flexibility.
b) Intended Function
Are you looking to create a simple footpath or a driveway for parking cars? If you want to build a paved surface that can hold structures or park vehicles, make sure you get stronger and thicker paving slabs that won’t crack under the weight.
c) Slab Style and Colour
There are plenty of paving styles and designs to choose from. These include rustic clay, tall hazel hurdles, and split sandstone for traditional designs and polished concrete, planed oak and quartzite for a modern scheme. You can get rough, sanded or cut surfaces and even choose from shades of honey, grey, brick red and earthy brown colours.
The Best Paving Slabs Reviews
1. Marshalls Council BSS Paving Slabs
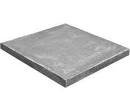
If you’re looking to maintain a neutral colour scheme from the kerbside all the way to your garage, Marshall’s has just the thing. Their natural BSS pressed paving slabs come in dark grey each measuring 600mm by 600mm by 50mm.
The thicker build and grey pimple finish makes these slabs ideal for shopping centres, driveways, footpaths, and any high volume traffic areas. And thanks to its anti-slip properties, the pimpled surface makes the slabs great for areas that get wet such as poolsides. These 2ft slabs are quite thick and come in packs of 10 with free delivery to UK Mainland.
What I like about it:
- High traction pimpled surface
- Low cost paving option
- Neutral grey finish
2. Robinwood Stone Concrete Paving Slabs
Are you a professional landcaper or just a homeowner looking to order your own construction materials? If you’ve got a decent sized yard and want to take the hassle out of hardscaping, you’d be surprised how much a fat stack of pavers really helps. These concrete paving slabs from Robinwood Stone measure 450 by 450mm and come in a generous pack of 50.
This roughly translates to covering an area of over 10sqm without any gaps between the slabs. Each slab is hand made in solid cast stone and comes with a striking antique type finish fit for any rustic garden theme. These ones have a Cotswold buff finish, but there are plenty of other colours available. The chiselling gives the slabs a rough, rugged finish that adds to the aesthetics.
What I like about it:
- Frost treated solid cast stone
- Pack of 50 offers great value for money
- Hand made with rustic finish
3. Robinwood Stone Charcoal Finish Patio Slabs
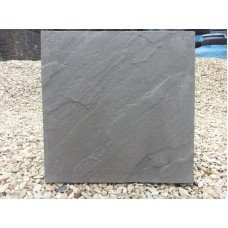
Here’s another pack of 50 paving slabs from Robinwood Stone, only this time you get them in a dark, Striking charcoal finish and a lower purchase cost to boot. But the lower price range doesn’t mean that anything’s been taken away; the black finish is ideal for low cost large scale commercial paving to show you mean business.
Like the other pavers from the same company, these ones also measure 450 by 450mm hand made from solid cast stone. That’s why they have the same rugged finish. Pack of 50 covers an area of 10.5 square metres. This means you can cover your patio, deck, and still have a lot leftover for your walkway.
What I like about it:
- Pack of 50 offers more value for money
- Suitable for indoor and outdoor use
- Comes in professional striking charcoal finish
4. Random Paving Cotswold Concrete Stones
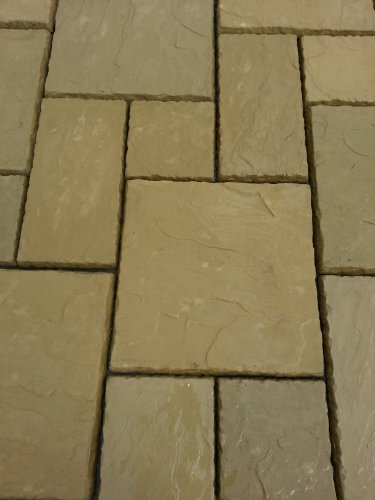
Like a little chaos with your order? Then you’ll appreciate the creative versatility that comes with the Random Paving Cotswold Concrete Stones. The stones themselves are uniform in design and theme; it’s the size difference that allows for an array of patterns when laying the slabs.
The stones come in 3 random sizes of 600 by 600mm, 600 by 300mm, and 300 by 300mm. However, all slabs come in an even thickness of 38mm. The purchase covers an area of 12.55 sqm per pallet of handmade, solid cast, frost treated paving stones. You can lay some of them across and others along to create unique patterns or natural looking stone paved surfaces.
What I like about it:
- Versatile random sized paving stones
- Handmade by master craftsmen
- Pallet covers 12.55 square metres
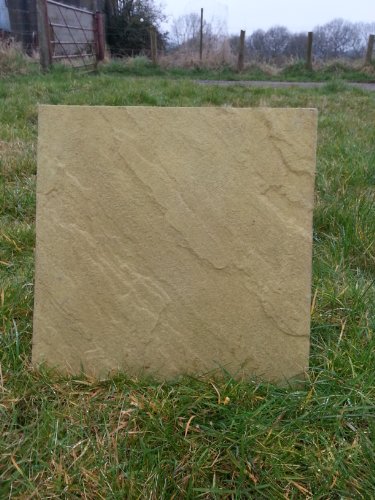
5. Rippon Buf Natural Indian Sandstone Pavers
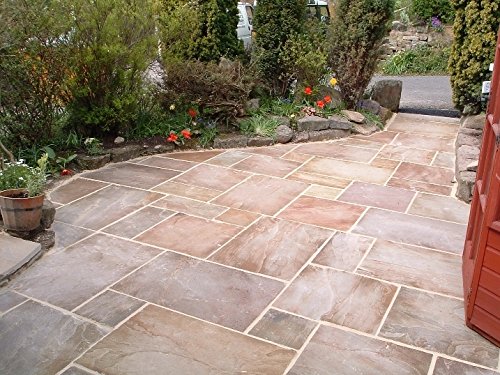
Want to add a colourful and vibrant aesthetic to your home or business? How about doing it with the Rippon Buf Natural Indian Sandstone pavers? These pavers come in a pallet of classic, sedimentary rock made of sand sized minerals and rock grains.
The different sizes that make up your 155sqm coverage include the following: 13mm thick slabs of 600 by 900mm, 600 by 600mm, 600 by 295mm, and 14mm thick slabs of 295 by 295mm. You can mix and match the slabs to create a unique surface. However, note that the smooth nature of these natural Indian stones makes them unsuitable for driveways and wet surfaces. They’re much more at home as patio slabs.
What I like about them:
- Colourful vibrant design
- Made from sand sized minerals
- Smooth frost treated finish
Frequently Asked Questions
Q: How to lay paving slabs on sand?
First, you will have to select an area that is level, well drained and firm – you can’t lay slabs in an area that gets regularly soaked by the rain.
- Prepare the ground by removing about 170mm of the grass, weeds and topsoil.
- Smooth and flatten the area – you can use a roller, compactor or lots of stomping!
- Make sure your edge restraints (the wooden borders that are to hold the slabs in place) are suitable to hold the slabs.
- Lay a base layer of about 100m of sand.
- Follow this with a 30mm layer of hard, grit sand.
- Lay the slab into the sand, keeping each slab 2-5mm apart.
- Tamp them down well.
- You can then use a rubber mallet to bed the slabs in even further – a rubber mallet won’t split the slabs as a metal one would, so don’t be tempted to use whatever you have got lying about.
- Once you have laid all your slabs, fill in the gaps between them with more sand, and sweep the excess into the gaps.
- Spray the slabs with a hose pipe, to allow the sand to settle.
- After the slabs settle in and the sand has dried, expect to see more gaps appear – simply add more sand until the area is firmly packed and the gaps don’t appear any more (this should take a week or so).
Q: How to cut paving slabs?
There are a few ways to do this. You can either cut them with a hammer and chisel, or a hand held saw, or go for block and slab splitters.
Before you cut a paving slab, whatever method you end up going for, you should kit yourself out with protective gloves and safety goggles, to minimise the risk of injury. Strong gloves ae also a good idea, to protect your hands from damage.
Hammer and chisel:
- Measure out where you want to cut your slab and mark it with chalk.
- Hold the chisel just outside the line you have drawn, and tap firmly but gently with the hammer until the slab splits.
- Use the chisel to remove any sharp edges and make a neat finish.
Hand held saw:
- Set the slab into a work stand or a vice, to keep it steady while you cut it.
- Measure where you want to cut, and mark the line with chalk for accuracy.
- Following your line, cut into the slab. Depending on the thickness of the slab, you may have to turn the slab over and cut through the other side too.
Block and slab splitters:
- You can hire a block splitter if you don’t have one or know anyone you can borrow one from – this is a cheaper method than going out and buying a brand new one.
- Set up the splitter on a level, stable piece of ground.
- Mark the slab where you want to cut it.
- Insert the slab until the blade sits over the place you want to cut.
- Lower the handle until the blade goes right through the slab.
This method is considered the best way, as it is more accurate than the hammer and chisel, and produces far less dust than the hand held saw option.
Q: How to clean paving slabs?
The simplest way, though also the one that requires the most elbow grease, is to scrub your paving slabs with warm soapy water. You will need a bucket, a hard bristled brush, and warm water.
Start by brushing and sweeping any lose debris off your paving slabs. Place soap and warm water into the bucket and swirl to mix it together.
Pour a little of this liquid onto the paving slabs, and leave for a minute or two to allow it to soak in. Dip the brush into the liquid and start scrubbing!
This will remove the most noticeable accumulated dirt from your paving slabs. Once you have achieved your desired results, rise the slabs with clean water, then step back and admire the results!
You can add bleach to this solution which will make the scrubbing slightly easier, but you should be aware that bleach can damage wildlife and plants, so try to keep it away from these as much as you can.
Another option is to clean your paving slabs using a pressure washer. Sweep the loose debris and leaves off your slabs, then connect your pressure washer to the mains water source.
You can add detergent if your pressure washer takes it, but bear in mind that this should not be necessary unless your slabs are very heavily soiled.
Select the Medium pressure setting on your washer, then start to spray – use a wide fan movement and keep the angle at about 45 degrees. Go from left to right and back to front, to ensure you cover the widest area with the most ease.
Q: How to stop weeds growing between paving slabs?
Before you lay your slabs, you can place a layer of landscaping fabric which will help prevent those pesky weeds. There will almost certainly be the odd blade of grass or determined weed that poke their heads up though, so you have a few options about how to deal with them:
- You can, if you have a small area and a bit of spare time, simply pull these weeds up by the roots when you see them appearing.
- A pressure washer is a simple ad easy way to remove weeds from in between paving slabs.
- Salt can kill weeds quickly ad easily – using 1 part salt and 3 parts water, spray the weeds between the slabs and wait for the mixture to dry. Once dried, add a layer of dry salt and you can watch the weeds die before your eyes.
- Boiling water is another quick and simple way to do away with your weeds – simply pour the contents of a kettle over your weeds and watch them shrivel!
- You can spray a small amount of weed killer in between the gaps if you are overwhelmed with weeds. Be aware though that weed killer can have a detrimental effect on the rest of the plants in your garden, so take care that it doesn’t spread around the plants that you want to keep.
Thank you Jack for sharing such a wonderful paving slab buying guide. Paving slabs are good option for the garden as they comes in variety of styles and colours which add aesthetic to the property.